

Overseer System
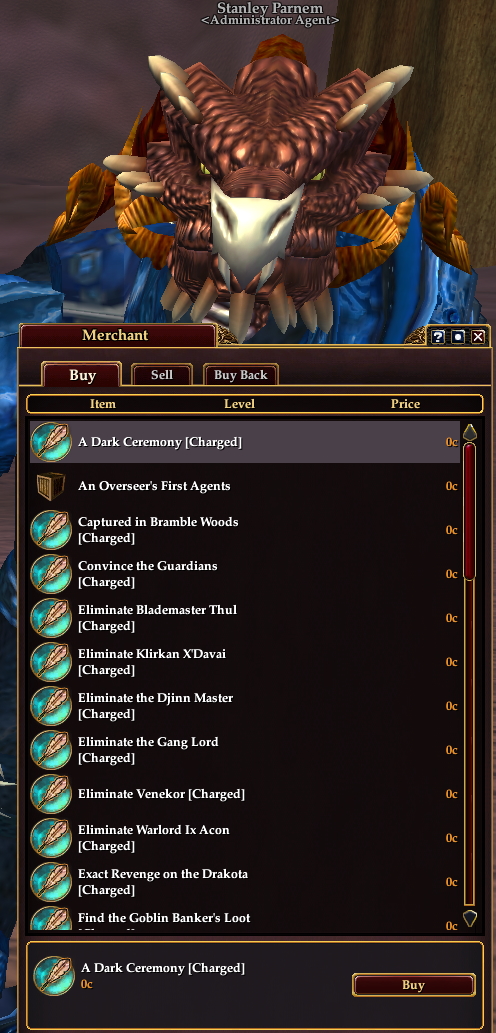
The Overseer system allows you to recruit agents and send them on adventures to obtain rewards for you. It's nice to be the boss! The Overseer system is available to All Access members, or if you purchased the Blood of Luclin expansion you will retain a limited access even if your membership lapses. If you are new to the Overseer system and want to progress naturally, you can obtain the starter pack "An Overseer's First Agents" from the Administrator Agent, Stanley Parnem, located in Freeport and the Qeynos Province District. Unpacking the starter pack will walk you through the basics of the system.
Overseer Quests
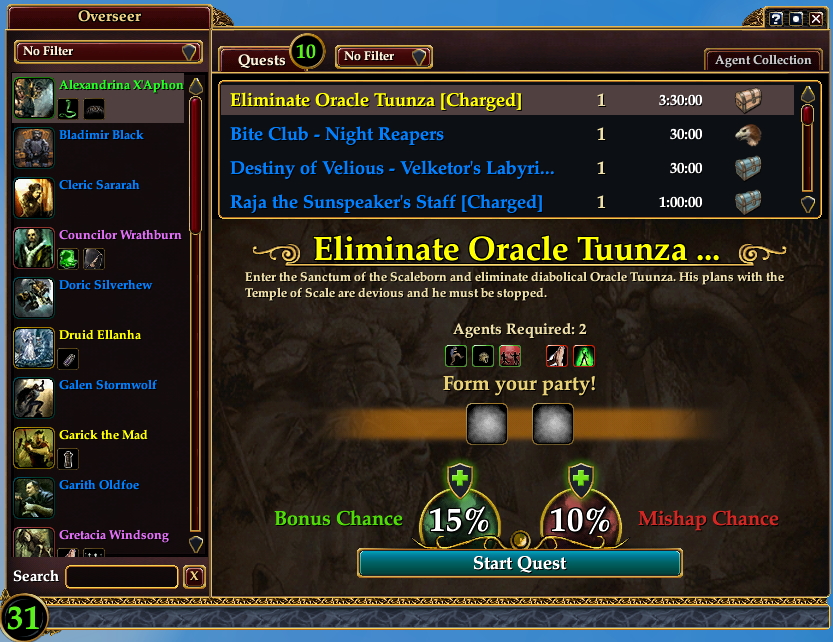
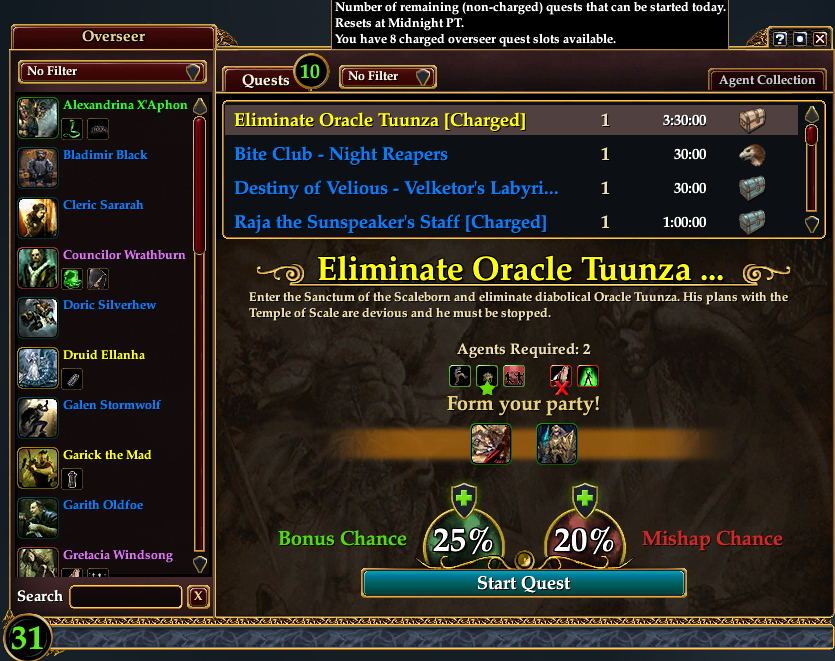
You will automatically have access to some quests, while others will be unlocked from various content, most notably from overseer quests rewards themselves. Members can run a total of 10 overseer non-charged quests per day on their account. Non-member Accounts that purchased the Blood of Luclin expansion are limited to 3 overseer quests per day. Higher tier quests typically take a longer time for your agents to complete, but have better rewards and a higher chance at bonus rewards.
To send your agents out on a quest, you must form the quest party with your agents. Each quest has a number of agents that are required to start the quest. Each quest also has certain aspects that make certain agents more, or less, suited to the task. These modifiers are represented in green for traits that increase the bonus reward chance, or red for traits that increase the chance of a mishap happening during the quest. If are assigning an agent to a quest, and they have a trait that will modify the outcome, that quest trait will have an indicator to show that it is being used. Red X's are not your friend.
When you complete an overseer quest, you will always gain a reward with a chance of obtaining a bonus reward, based on the difficulty of the overseer quest and modifications from your agents and mercenary helper.
The Bonus Chance and Mishap Chance may also be further modified by assigning one of your mercenaries and/or familiars to assist with the quest. Higher tier mercenaries and familiars grant larger modifiers when they are assigned to a quest. Assigning mercenaries and familiars in this way does not prevent you from using them while adventuring, they are experts at remote management.
Overseer Quests [Charged]
Through your adventures, you will obtain charged quests which you may also send your agents out to accomplish. Charged quests do not count toward the number of quests that you can run per day, they are instead limited only by the fact that you can only have 10 charged quests in your overseer manifest at a time. So if you are currently running 10 charged quests, you will need to wait for one to finish, and complete it/claim the reward, before adding another charged quest to your overseer manifest.
There are some special charged quests that do not count towards the limit of charged quests in your manifest. These special charged quests are typically promotional or live event quests, and do not have the [Charged] tag in their title.
Overseer quests are account wide, and once obtained may be started from any character. However, you can only complete an overseer quest from the character that started the quest. So while you can see a quest that any character on the account has initiated, you must return to that character to complete that quest.
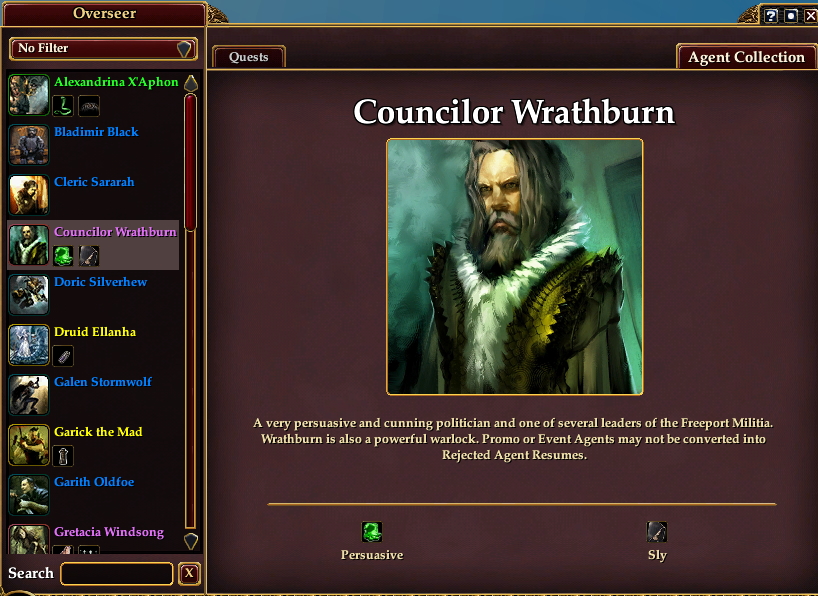
Overseer Agents and Agent Traits
Each agent of Legendary tier or greater will have a number of specific traits that make them more suited to participating in specific quests, and less suited to others. You can search for an agent with a specific trait by typing the name of the trait in the search bar on the bottom of the agents list, or by clicking on the trait from an overseer quest.
Overseer agents are gained primarily through completing overseer quests.
Overseer Mishaps
Sometimes bad things happen to good agents. Be it an injury caused by a scuffle with some goons, being captured by cannibal pigmies, or little Timmy falling down a well. When this happens, your agent will be afflicted with a mishap, and be unable to be sent out on normal quests. Not to fear however, your agents are hearty and skilled operators, and will eventually extricate themselves from their predicament. Alternatively, you may also send some agents to assist the afflicted agent in a quest to speed that process up. And just like normal quests, even mishap quests will provide rewards.
Overseer Experience and Leveling
As you complete adventures, you will begin gaining overseer experience, overseer levels, and overseer seasons. Each overseer season is contained within a 10 level range, so overseer season one is level 1 through 10. Once you gain overseer level 11, you are now within the season two level range, and you will only see permanent overseer quests of season two in the manifest. You will only see permanent overseer quests of your current overseer season in your overseer manifest. Any permanent overseer quest you have unlocked in previous seasons may now be obtained from Stanley Parnem as charged quests, so you do not lose access to anything you have previously unlocked.
If you wish to skip the early seasons and jump ahead a bit, you may complete the Days of Summer and Panda Panda Panda quest lines in the Sundered Frontier to obtain a boost bauble that will advance you to Season Three, level 21. You may still gain access to previous season overseer quests by running the charged versions of that seasons quests that you obtained via the starter pack or season achievement rewards.
Ascension Classes
The apotheosis of a specific facet of energy, Ascension classes are the gateway to ascended power for characters above level 100 who possess the Kunark Ascending or later expansion packs. For the traditional experience, you may speak with one of the four masters in the Obulus Frontier to begin down the path to Ascension. To jump right into more advanced applications of power, you may complete the Days of Summer and Panda Panda Panda quest lines in the Sundered Frontier to obtain a boost bauble that will advance you to ascension mastery.
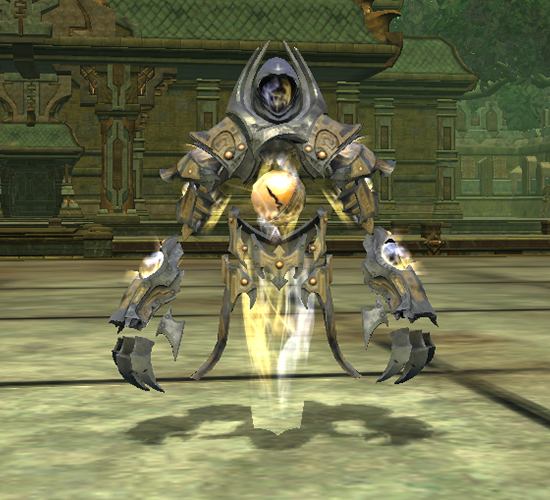
Ascension Forms
Each Ascension class grants an adventurer the ability to shift into an avatar of that Ascension, converting all damage done by the player and the player's pets into that damage type.
- Elementalist: Wielders of the opposing forces of fire and ice, Elementalists have the power to rain down destruction or degrade the defenses of an opponent. Initiates of this class convert ability damage to cold.
- Etherealist: Master of arcane and planar energies, Etherealists have abilities that deal with the manipulation of ambient or latent magical power. Etherealists convert ability damage to magic.
- Geomancer: Sometimes the most effective form of persuasion is the application of brute power. Geomancers are able to bring staggering force down on an opponent, converting ability damage into crushing.
- Thaumaturgist: Most things have some form of life energy, and Thamaturgists are able to manipulate and control it, twisting and bolstering that energy to meet their needs. Blood Mages convert ability damage to disease.
How to Level Your Ascension Class
Once an Ascension class has been initiated you will start receiving Celestial Ascension experience from adventure missions until your Ascension level is at or above level 20, or alternatively you may complete the Days of Dummer and Panda, Panda, Panda!, quest lines in the Sundered Frontiers to obtain a boost bauble that will advance you to ascension mastery. Gaining Ascension levels above 20 is accomplished by earning Ascension account flags that will automatically grant any character on the account that Ascension level.
Changing Your Ascension Class
Changing Ascension classes is as simple as going to the appropriate Ascension master and picking up the class. All of the progress made on your current Ascension class is saved, and you will pick up right where you left off when you return to that class. Any Ascension abilities you have earned will remain in the Ascension tab in your knowledge book, though you will not be able to access them until you return to the matching Ascension class.
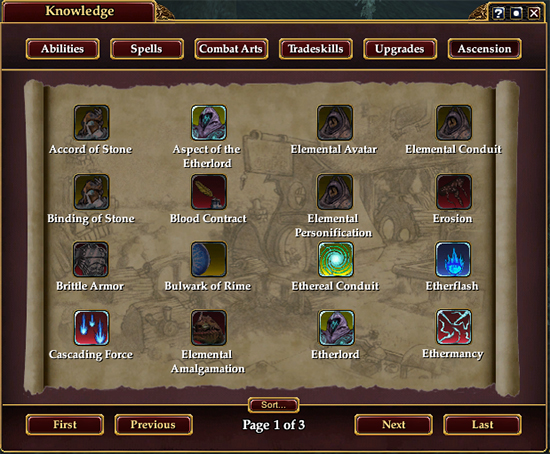
Note that many of the abilities in the above knowledge book are greyed out because they are from an ascension class that is not currently active.
Ascension abilities can combo with other abilities to add an extra effect. In addition, Ascension abilities have the full range of spell tiers from apprentice to ancient.
Mercenaries
If you are a player who plays solo, you can often find yourself in need of just a little bit of extra help. Never fear, the mercenary feature is here to provide that exact assistance! While not as powerful as one of your fellow players, they help fill roles that your class isn't proficient in. The different roles of mercenaries are: Healer, Ranged, Melee, Tank, and Support, though many mercenaries blur the lines a bit and provide more then just their base role. The mercenary feature is granted when you purchase any modern expansion, or you can purchase the stand alone feature in the marketplace.
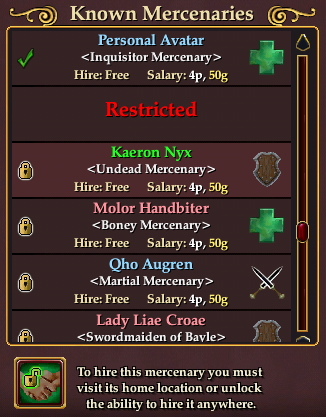
Hiring, and firing Mercenaries
Some mercenaries are just there for the hiring, you can find several of these in the Freeport and Qeynos mercenary dens, however many require that you first unlock their mercenary contract. Mercenary contracts can be found from many sources, including drops from encounters or quest rewards, which some others are earned via specific methods, such as participating in one of the beta tests, or promotional giveaways. Once you have obtained the contract, simply sign it, then seek out that mercenary in the world and you will be able to hire them. Once unlocked, you will always have access to hire that mercenary again, either from seeking them out in the world again, or you can unlock your mercenary to be hired anywhere.
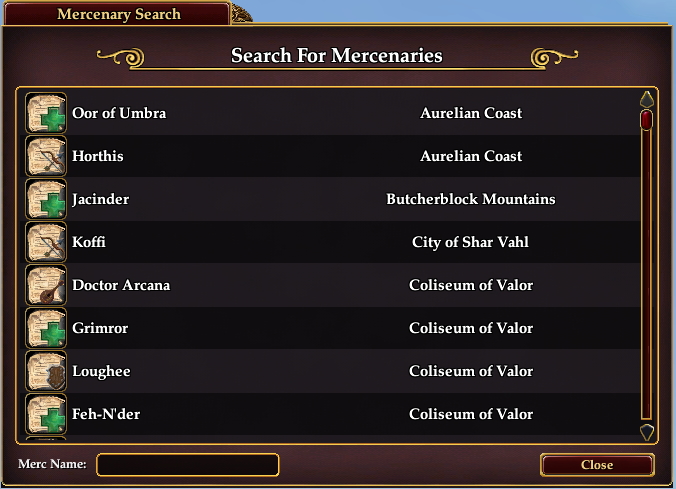
Search Mercenaries
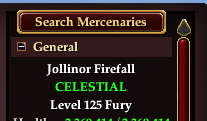
If you are like many of us, you enjoy expanding your stable of mercenaries, and sometimes it can get a bit overwhelming to remember where exactly a particular mercenary is located. Thankfully, now you don't have to! On the top right of the mercenary window, you will find a Search Mercenaries button, which will bring up a handy list of all mercenaries and where they are located.
Mercenary Leveling and Equipment
While mercenaries are quite adept at walloping the occasional moss snake, even the most adroit sell-sword can be taught a thing or two by an experienced adventurer. With each level gained, your mercenary earns access to one or more equipment slots for armor or mercenary-only Accolades. If the mercenary has been unlocked to hire anywhere, they will also start gaining contribution to the Battalion effect, described below. To start training your mercenary, simply open up the mercenary window and select the view current mercenary button, then press the "Start Training" button located near the bottom.
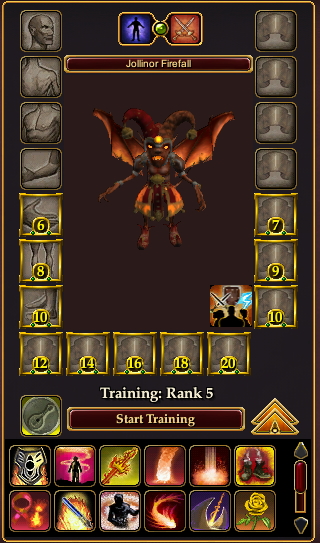
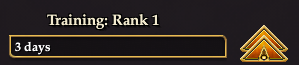
The training time required to obtain the next level on your mercenary begins at three days, which progresses whether or not you are currently playing, and increases as the mercenary obtains higher levels.
You may accelerate your mercenary's training by obtaining training time reduction potions rewarded from various sources in game or by completing each level immediately for Daybreak Cash.
Mercenary Armor
Training your mercenary allows you to equip them with any armor that you come across and do not want to personally use yourself. While you must meet the minimum level to equip the armor yourself, mercenaries do not have restrictions on what they can wear. Mercenaries do not change their appearance based on the armor that they equip in these slots.
Mercenary Accolades
A mercenary cannot wear the same jewelry as your characters, they instead make use of special accolades which can be obtained through adventuring or crafting.
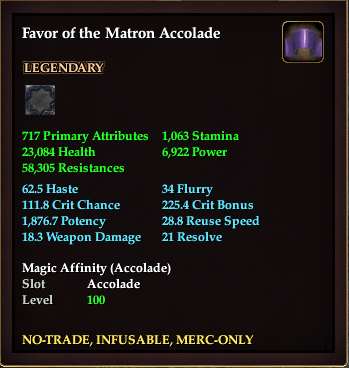
Mercenaries do not gain the benefits of Adornments, Item Sets, or Effects on their worn items.
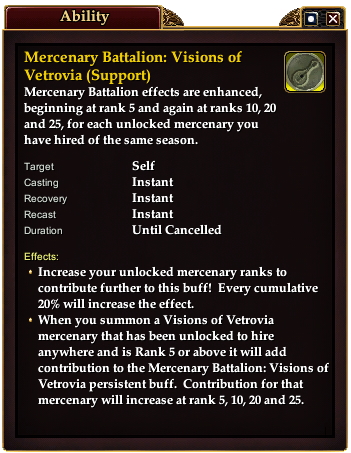
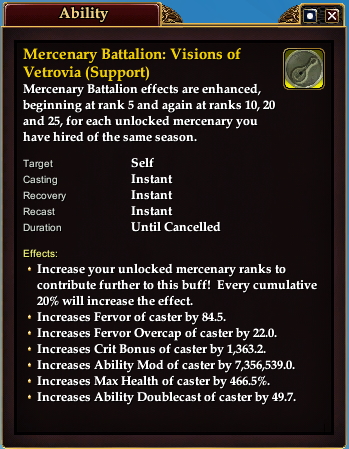
Mercenary Battalion
Once you have unlocked your mercenary to hire anywhere and trained it above level 5, your mercenary will begin to provide bonuses to you even when it is not summoned. The more powerful the mercenaries that contribute to the Battalion effect are, the more powerful the effect is. To check the amount your current mercenary has contributed to the effect, simply right click them while they are summoned, and they will tell you how much they have personally contributed to the effect, as well as how much total contribution the effect has.
Familiars
Familiars are magical critters found throughout Norrath that that can be used to enhance the power of their master, and granting them triggered or passive effects.
Familiars come in four tiers: Treasured, Legendary, Fabled, and Celestial.
Obtaining a Familiar
You can start filling your familiar menagerie by visiting Steward Kres in Freeport, or Steward Aelin in Qeynos who will grant you a daily mission to collect specimens for a reward of a random familiar. Familiars can also be found as rewards from many adventuring or public quest missions.
Leveling Familiars
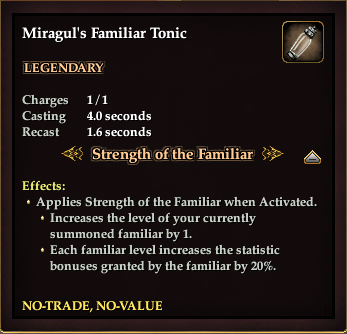
When first obtained, your familiar will be a level one familiar, granting its base bonuses. Each familiar can be leveled up to level 10, and each level increases the statistic buff values by a percentage. Triggered and passive effects are not modified by familiar levels.
Familiar Tonics and Training Potions are available through various promotions and events, such as Yun Zi the Days of Summer merchant. When consumed, these potions immediately increase your currently summoned familiar's level by 1. Different tonics have different restrictions on what level they can raise your familiar to, so apply them with care.
In addition to familiar training potions and tonics, you will also be able to use new familiars to level your favorite familiar. The amount of experience that the familiar is worth is based on its tier. Common treasured familiars are worth 100 experience, while uncommon legendary familiars are worth 1,000. Fabled and ethereal familiars are worth even more!
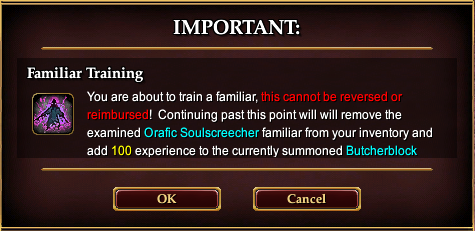
Familiars cannot be consumed out of your familiar collection, only from your inventory bags. Familiars earned through /claim, quests, and any other specialized way will not be able to be consumed for experience.
Mounts
A lot has changed since the first Paladins and Shadowknights dinged level 20 and pulled out their mighty 10 movement speed (we don't talk about the dark days before they were 10) steeds. Mounts are no longer just a travel mechanism, but are now a powerful ally in the fight against the vicious critters that are hording your loot. Many of them provide powerful buffs in their own right, and can be equipped to be even more powerful.
And some of them look hungry.
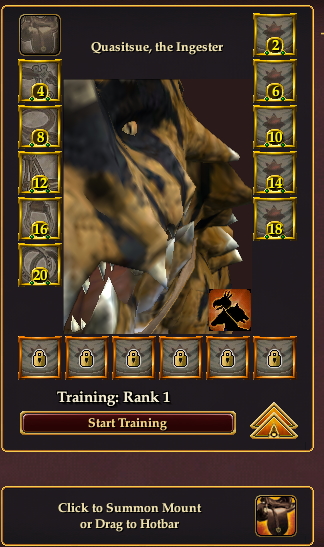
Mount Leveling and Equipment
Much like mercenaries above, mounts earn access to one or more equipment slots as they level up. Mounts however are special, as they have specific pieces of tack that they gain access too. A T-Rex would look funny wearing your shirts after all. There are six specific mount gear slots that you can place a single one of each gear type in, Saddle, Hackamore, Reins, Breeching, Stirrup, and Shoes, as well as a generic Barding slot that can have multiple of the same item equipped.
To start training your mount, simply open up the mount window, and select the button to view your currently summoned mount, and then press the "Start Training" button located near the bottom.
The training time required to obtain the next level on your mount begins at one and a half days, which progresses whether or not you are currently playing, and increases as the mount obtains higher levels.
You may accelerate your mount training by obtaining training time reduction potions rewarded from various sources in game or by completing each level immediately for Daybreak Cash.
Wardrobe
Is your bank a giant shoe closet? Do your bags double as a coat rack for your favorite threads? Well fear not, the Wardrobe feature is here! With the Wardrobe, players can store the appearances of their items on their character to be worn as appearance gear without cluttering up precious inventory space.
To add equipment, click on the Wardrobe tab in your character window and drag the item from your inventory onto the "Add to Wardrobe" section at the top of the page. You may also drag the item onto any of the icon rows.
You will receive a prompt explaining the item will be destroyed and stating the category the item will be added to.

For One-Handed or Dual Wield weapons, you will be asked to choose either the Primary or Secondary category, which can be changed at any time (see Switching Weapon Categories below).
Equipping Wardrobe Appearances
There are NO class restrictions that prevent you from adding equipment to your Wardrobe - equipment added to your Wardrobe will be destroyed!
There are two ways to equip Wardrobe appearances:
1. Click the "Appearance" tab on the character window, and then click on an appearance slot. If you have Wardrobe items associated with that appearance slot, you will see a pop-out menu showing those items. Clicking on any item in the pop-out menu will equip its appearance.
2. Simply right-click the item in your Wardrobe and choose "Equip Wardrobe Item."

Removing Equipment from your Wardrobe
To remove equipment from your Wardrobe, right-click on it and choose the "Remove from Wardrobe" option. You will then be asked to confirm the removal.
Note: Equipment removed from the Wardrobe will not be returned to your character!
Switching Weapon Categories
One-Handed or Dual Wield weapons may be placed in either the Primary or Secondary categories.
If you wish to move one of these weapons to the other category, simply right-click on the weapon and choose "Switch Wardrobe Category". This requires you have an open slot in the destination category.
Note: This option will only appear once the icon's examine information is done loading (when you can see the item's tool-tip).
Appearance Item Sets
Wardrobe equipment is fully functional with your Appearance Item Sets.
Once you have your Wardrobe appearances equipped, simply click on the Sets tab (in the Appearance section) and click either the "Create New Set" button or save over an existing set.
House Displays
When dressing a Mannequin, you can access appearances from your Wardrobe by left-clicking on the associated equipment icon slot on the Mannequin's UI.
A lot of changes have come to EverQuest II, but they should help make your adventures a little bit easier. Return back to this guide whenever you need a quick refresher. We can't wait to see you back in Norrath!
[This article was updated on November 7, 2022.]
Join us on social media: Twitter, Facebook, Instagram, and Discord.